| Version 4 (modified by JoelSherrill, on 01/21/09 at 02:39:45) (diff) |
|---|
GSoC Getting Started
Table of Contents
GSoC 2008 was the first time the RTEMS Project participated in the Google Summer of Code. After talking to mentors from other projects, we noticed that we all suffered from a "getting started" issue. You are more likely to have a successful project for any organization in GSoC if you are able to build their code, run their examples and make minor modifications. The quicker you cross this hurdle, the sooner you will be doing "real" work.
You will be best served by using a GNU/Linux distribution for which we provide RPMs. The core RTEMS developers use Fedora. As of January 20 2008, most core RTEMS developers have moved to Fedora 10. We will ALWAYS be on a version that is supported by the distribution.
Configure a Development Computer
This step involves the following steps.
- Install or update GNU/Linux distribution as needed.
- Install RTEMS Tools. See RTEMS Development Hosts for information but remember we encourage you to use Fedore and thus you will follow the APT/Yum instructions.
As you will be compiling code, it is recommended to have a reasonably fast machine.
Configure and Build RTEMS
- Check out RTEMS from CVS (LINK)
- Bootstrap RTEMS (LINK)
- Build RTEMS for a "preferred" BSP
- The preferred BSP depends on your project but your first choice should be a BSP that runs on a simulator included in gdb. SPARC/sis is a good candidate because it is easy to work with.
- If your project requires a BSP to support TCP/IP of something else not supported by SPARC/sis, then still first try a simple environment like SPARC/sis and then move on to the one that will support your project. Discuss your project requirements on the RTEMS mailing list and let the community help point you in the right direction.
- Build RTEMS for the SPARC/sis BSP
- Run hello world example in source tree.
- Install RTEMS.
- Build hello world included in the class-examples CVS module.
- Run hello world example in the class-examples CVS module.
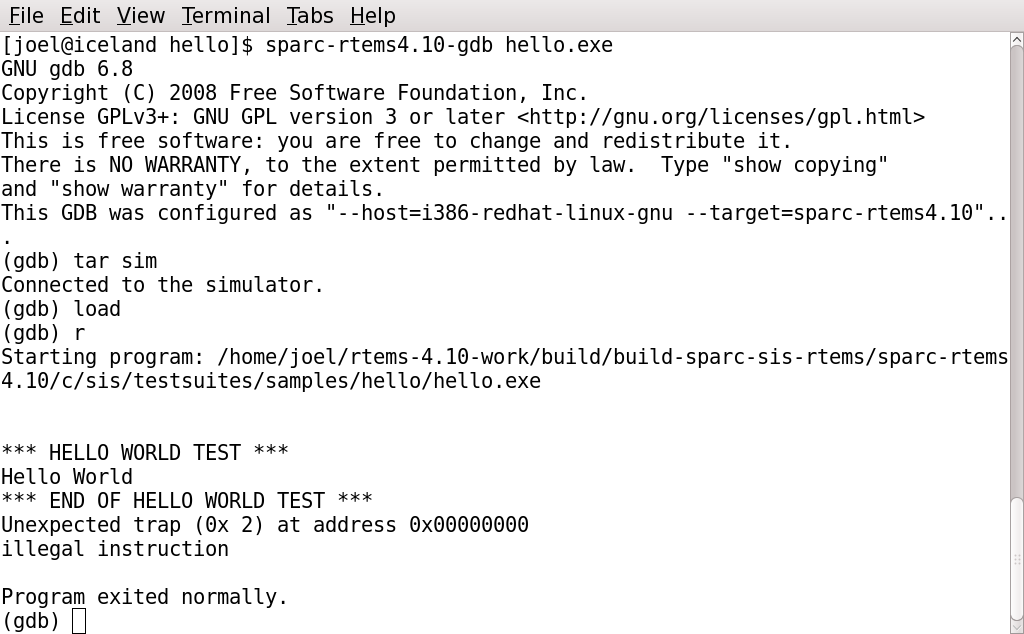
The sparc-rtems4.10-gdb session with the unmodified hello world will look something like the following:

Note that this image is careful not to show you how to configure or build the executable being run.
Prove You Can Work On RTEMS
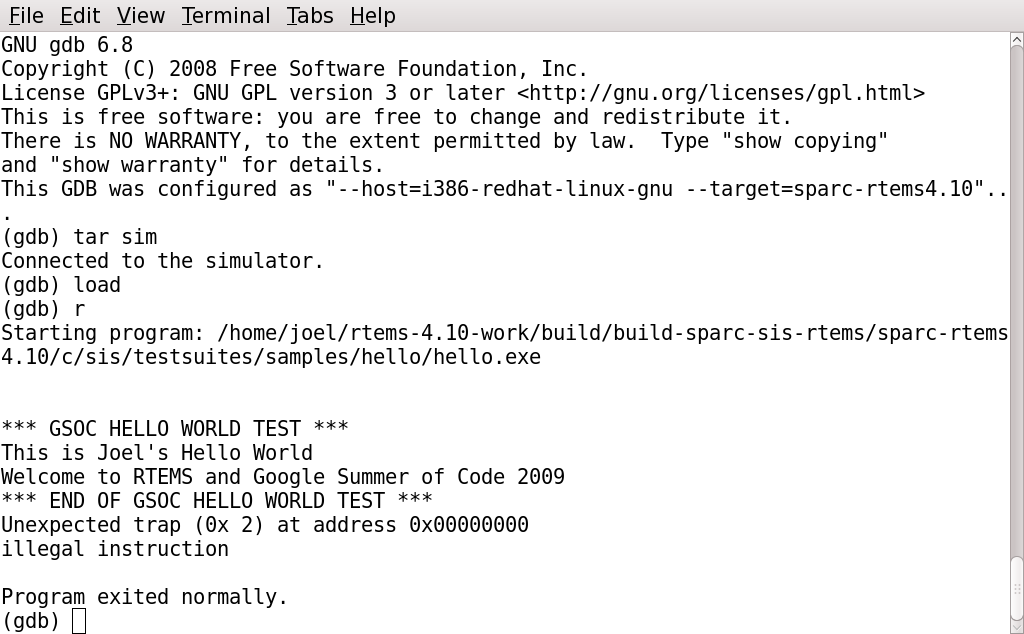
Modify the hello world example in the class-examples CVS module to include your name. Something like "Hello Fred!". Then send us enough to prove to us that you did this. We want to know you can work with RTEMS.
- Send a "cvs diff" of your changes. This will look something like this:
Index: init.c==  =============================================================

RCS file: /usr1/CVS/rtems/testsuites/samples/hello/init.c,v
retrieving revision 1.15
diff -u -r1.15 init.c
--- init.c	11 Jan 2008 22:50:10 -0000	1.15
+++ init.c	20 Jan 2009 21:13:09 -0000
@@ -29,8 +29,9 @@
   rtems_task_argument ignored
 )
 {
-  printf( "\n\n*** HELLO WORLD TEST ***\n" );
-  printf( "Hello World\n" );
-  printf( "*** END OF HELLO WORLD TEST ***\n" );
+  printf( "\n\n*** GSOC HELLO WORLD TEST ***\n" );
+  printf( "This is Joel's Hello World\n" );
+  printf( "Welcome to RTEMS and Google Summer of Code 2009\n" );
+  printf( "*** END OF GSOC HELLO WORLD TEST ***\n" );
   exit( 0 );
 }
- Take a "snapshot" of your modified hello world and send us the png. On GNU/Linux, you should be able to press the "Prnt Scrn" button or use the "xwd" command. This is a snapshot that Joel Sherrill? took after running the hello world program with the above changes.

If your project requires more of a test environment than SPARC/sis provides, then repeat the hello world steps on the BSP we help you select. If your project involves developing a new BSP, then you may want to run on a BSP from the same target architecture on a simulator. Again we will help you select the BSP.
We will assist you in anyway possible along the way. We want you to have a functional RTEMS Development Environment as soon as possible so you can move on to the real project.
Attachments (2)
-
SPARC-SIS-HelloWorld.png (74.6 KB) - added by Amar Takhar on 11/23/14 at 05:06:51.
Imported from old wiki.
-
SPARC-SIS-HelloWorld-Modded.png (76.7 KB) - added by Amar Takhar on 11/23/14 at 05:06:52.
Imported from old wiki.
Download all attachments as: .zip